Sewing, Dressmaking, Pattern-cutting
& Soft Furnishing Classes
How to insert a invisible zip
This is a selection of machine feet suitable for inserting a invisible Zip

1

2
View 1 & 2 are sliding feet , great for a lot of applications. If you are going to buy 1 foot this is the one I would suggest as it has a lot of uses. The good thing with this foot is that it moves to work with the position of your machine needle.

3
3. The standard foot that comes with most machine it varies a little in shape but it work left and right of the machine needle.

4

5

6

7
4. This is an invisible zipper foot, not my favourite as it has a tendency of running over the zipper teeth if you not careful, which then requires a lot of careful unpicking. The reason it does that is that the bar on the underneath (view 5) of the foot does not come down to the machine bed, leaving a gap causing the problem.
6. This invisible zipper foot is the Janome but for me it is the most reliable foot as it has a bar that protrudes from the front which opens the teeth as you sew and the centre bar that comes right down to the machine bed as you can see in view 7, making easy work of the application.
Getting the zip right
The invisible zipper is sometimes called a concealed zip but they are both the same. An invisible zipper has the teeth on the back, (view 1) on the front of the zip is just the zip pull (view 2)

1

2
Step 1, Neaten seams that zip is going in, either zig zag, overlock or pinking shears.
Step 2, open zip, invisible zips are always sewn in open.

3
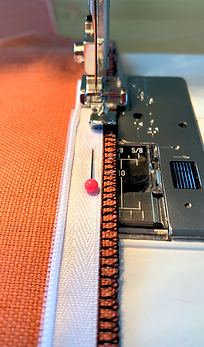
Step 3, with the right side of the fabric facing you, pin the zip in place, with the pin heads coming down the zip so they can be pulled out as you sew down the zip, always from top to bottom(view 3).
Step 4, Stating at to stopper (that is the hard bit of plastic at the top of the zip)sew down the zip in the middle of the zip tape, this acts like a tacking stitch but you don't have to remove it (view 4). And finish at the slider this leaves both the top and bottom of the zip NOT sewn to the garment
Step 5, using the invisible zipper foot repeat
sewing from the top of the zip making sure
that the zip teeth fit into the Chanel on the foot then as you sew gently push the bar towards the teeth, if using a slider foot then do the same push the foot towards the teeth (view 5).
Remember do NOT sew the top and bottom of the zipper to the garment.
4
If you have sewn in correctly you should now only be able to see the first row of stitching the second row should be under the teeth (view 6)

6

5
Repeat the same for other side, sewing from top to bottom which may feel strange as the work will be on the inside area of the machine (view 7, 8, 9)
7

7

8

9
If when you close the zip you can still se the teeth the just resew the zipper closer to the teeth (view 10) No need to un-pick.

10
We are near the end closing the seam, this can be tricky just follow the images step by step.
Holding the bottom end of the zip that isn't sewn down, pull the zip end away from the garment and pin, be carful not to follow the curve on view 11 as this will cause a bump on the right side of the garment.
View 12 the pins come straight for the zip, this is correct.Then using the standard zipper foot or sliding foot, get as close as possible to the zip and sew remember that this either needs a reverse stitch or if you prefer hand stitch to secure the ends.

11

12

13

14
The zip is finished
When closed you should not see the teeth

